


Improve your stream performance with WIP limits
The IT Kanban Method emphasizes six practices. The second practice recommends limiting work in progress (WIP) to avoid bottlenecks and adapt the workload to the team’s capacity.
In this article, we will analyze what WIP limits are used for and how to calculate them.
Limits for what?
Establishing WIP (Work In Progress) limits is a key practice of the Kanban IT method. Limits help control workflow and optimize team productivity.
Limits ensure that there are not too many items in the work in progress, relative to the team’s capacity, but also that a minimum number of items is present to ensure service continuity.
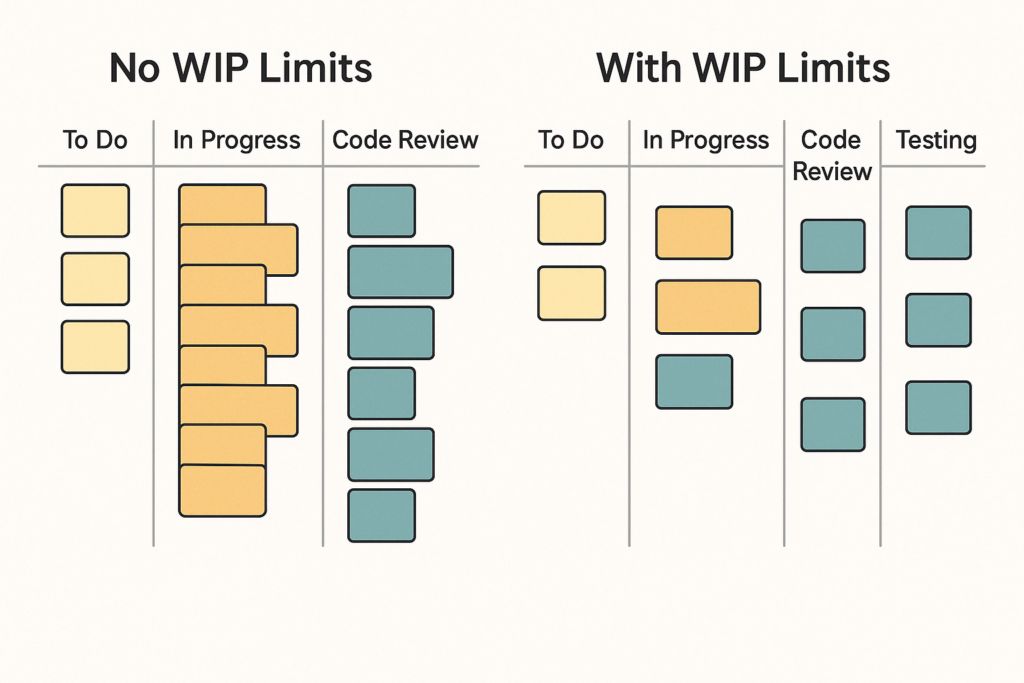
Although limiting the amount of a flow may seem counterintuitive, it brings undeniable advantages:
- Reduced bottlenecks: By limiting the number of tasks in progress, you can more easily identify process steps that are slowing down workflow. This allows you to focus improvement efforts on those specific areas.
- Improved quality: With fewer tasks in progress, team members can focus more on each task, reducing errors and improving overall work quality.
- Reduced lead times: By limiting WIP, you reduce the waiting time between process steps, which speeds up task delivery.
- Improved collaboration: WIP limits encourage collaboration and communication within the team, as members must work together to meet these limits.
- Flexibility and adaptation: WIP limits can be adjusted based on the team’s needs and capabilities, allowing for continuous process adaptation.

How to implement WIP limits?
Identifying and setting WIP limits is not an exact science and depends on several factors, including team size, task complexity, technical and organizational constraints, and the work capacity of each member.
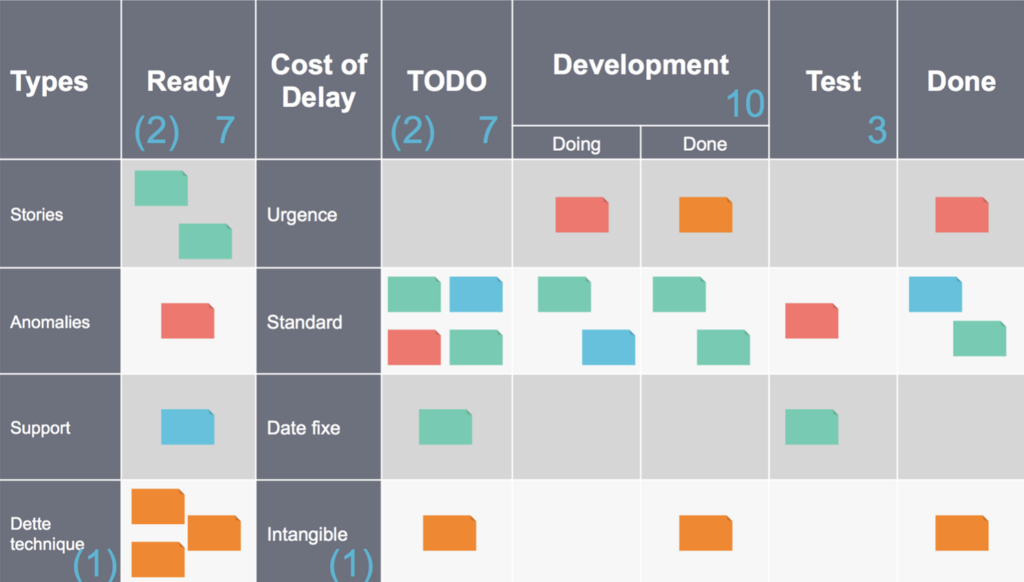
When launching your Kanban System
The first step before setting WIP limits is to clearly map and make visible the value creation flow of your Kanban system.
You must then assess the team’s capacity by estimating the number of tasks your team can reasonably manage in parallel without compromising quality.
When starting a new flow or a new team, it can be tempting to set WIP limits without having any historical data.
An unofficial practice can be to “arbitrarily” set WIP limits, based on the number of people involved in each step of the flow:
- Upper limit for a step: [Number of people in the step * 2] – 1
- Lower limit for a step: [Number of people in the step] – 1
The limit applies to both the active step and the step’s buffer.
Example: You have a team of 5 developers. How do you calculate the limits for the “CODING” stage, divided into two sub-columns: “CODING WIP” and “CODING DONE”?
- Upper Limit = 5 * 2 – 1 = 9 tickets maximum for the CODING stage
- Lower Limit = 5 – 1 = 4 tickets minimum for the CODING stage
Now let’s imagine that developers also need to perform code review activities, via the “CODE REVIEW” step, split into “REVIEW WIP” & “REVIEW DONE”. In this case, applying this formula to the “CODING” step and the “CODE REVIEW” step can cause activity overload and bottlenecks:
- CODING Upper Limit = 5*2 – 1 = 9 tickets maximum for the CODING step
- CODING Lower Limit = 5-1 = 4 tickets minimum for the CODING step
- CODE REVIEW Upper Limit = 5*2 – 1 = 9 tickets maximum for the CODE REVIEW step
- CODE REVIEW Lower Limit = 5-1 = 4 tickets minimum for the CODE REVIEW step
In this case, one way to do this could be to divide the development team into the 2 activities:
- CODING Upper Limit = 2.5* 2 – 1 = 4 tickets maximum on the CODING step
- CODING Lower Limit = 2.5-1 = 1.5 rounded to 1 ticket minimum on the CODING step
- CODE REVIEW Upper Limit = 2.5* 2 – 1 = 4 tickets maximum on the CODE REVIEW step
- CODE REVIEW Lower Limit = 2.5-1 = 1.5 rounded to 1 ticket minimum on the CODE REVIEW step
As I mentioned before, this method isn’t “official” and doesn’t always take into account workflow constraints, but it remains a first step in implementing WIP limits and should, above all, be temporary.
You can also decide not to implement any WIP limits, while you gather sufficient historical data on workflow processing, allowing you to base your WIP limits on the actual constraints of your system, while still defining a simple rule: “A team member can only handle one ticket at a time, and a ticket can only be accepted when a team member is available.”
After a few weeks and data…
Your flow has now been operational for two to three weeks. You’re using a digital application like Flow Analytics Pro, which allows you to measure and analyze the quality of your flow, whether you’re using Scrum, Kanban, SAFe, or another Lean/Agile framework.
Here’s a method, still unofficial, that you can use to measure your upper and lower WIP limits.
Let’s start with the real-life scenario of a development team.
1 – It measures WIP, at each stage of its Kanban flow, over a month (20 working days in February 2025).
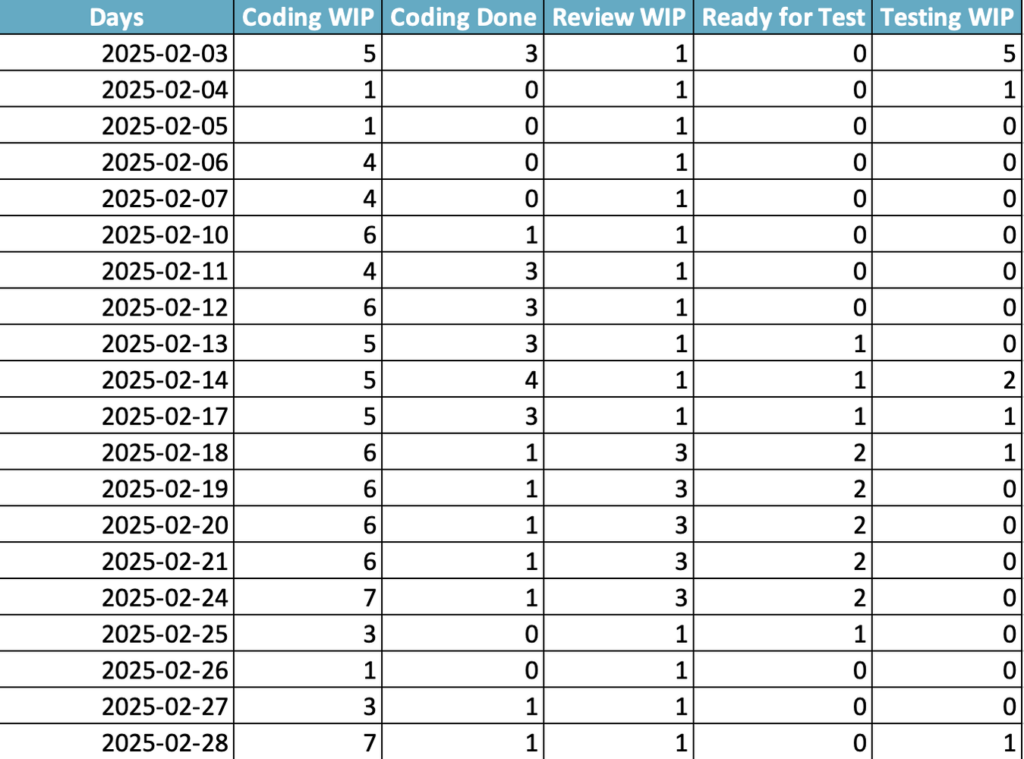
2 – It then calculates the average WIP, on each step of your flow

3 – As well as the standard deviation of each step of your flow

4 – The team then applies the following formula to calculate the upper limit for each stage of the flow:
Upper Limit = Average WIP + 1.5 * Standard Deviation

5 – As well as the formula for calculating the lower limit for each flow stage
Lower Limit = Average WIP – Standard Deviation

6 – The team must also consider its constraints and adjust its limits
Since the measurement takes place over the last month, you must take into account the team’s new constraints in order to adjust your WIP limits. For example, when the team loses a developer.
Adjust continuously: WIP limits are not fixed. Regularly monitor the workflow and adjust the limits based on the team’s performance and changes in the process.
Conclusion
WIP limits are a powerful tool for improving your team’s performance and optimizing your workflow. By implementing them thoughtfully and continuously adjusting them, you can reduce bottlenecks, improve quality, and accelerate task delivery. Feel free to experiment and adapt these limits to the specific needs of your team and project.